One of the reasons I decided to run my own Linux server was for continuous integration/deployment (CI). CI has been a great choice for all of my projects, even on the web! In the past I would rely on manually using FTP systems such as sftp or FileZilla to upload changes to production websites. This was a very tedious process with a high potential for error. Using CI I’m able to forget about managing files and rest easy knowing my version control server (VCS) repository is synchronized with production at all times. This post walks through how I configured CI for this site along with other web projects I manage.
Prerequisites
I used the following technologies to achieve this:
- Bitbucket
- Ubuntu Server
- A web hosting solution
Synopsis
I use the following approach to achieve CI development for this site:
- Create or get an issue from my issue tracker system (Bitbucket in this case).
- Create a git branch using the issue number.
- Implement and test the changes on my local machine.
- Push the issue/branch to the remote.
- Open a pull request against the
masterbranch. - Verify the code and merge to the
masterbranch. - Close the issue and delete the issue branch
My Bitbucket repository has a webhook configured to trigger a Jenkins job. The Jenkins job fetches the latest code from master, packages it into a tar.bz, delivers it to production and unpacks it. That’s it, production is updated and automatically synchronized with your VCS. If anything goes wrong you can update the VCS head and Jenkins should kick in again. I prefer this method because everything is tracked. You have an issue number describing the intended changes, a detailed pull request that document all the commits and a clean history.
Configuration
My configuration utilizes four machines: A Development machine (my laptop), CI server (my home server), VCS server (Bitbucket) and the production server (the web host for this site). The configuration for each of these is as follows:
Development Machine
My development machine runs a LAMP stack with a WordPress installation. It has all the development tools I need such as git, IDE’s etc. Nothing to configure here for CI.
Continuous Integration Server
Add a new build job to your Jenkins installation. Enter the configuration view for the new job, scroll to “Source Code Management” and select “Git”. Enter your Bitbucket Repository URL and select your credentials (add them to Jenkins if you need to). Jenkins should notify you if your credentials are invalid. */master should appear by default for a branch. If you want to use a branch such as release for production update it here.
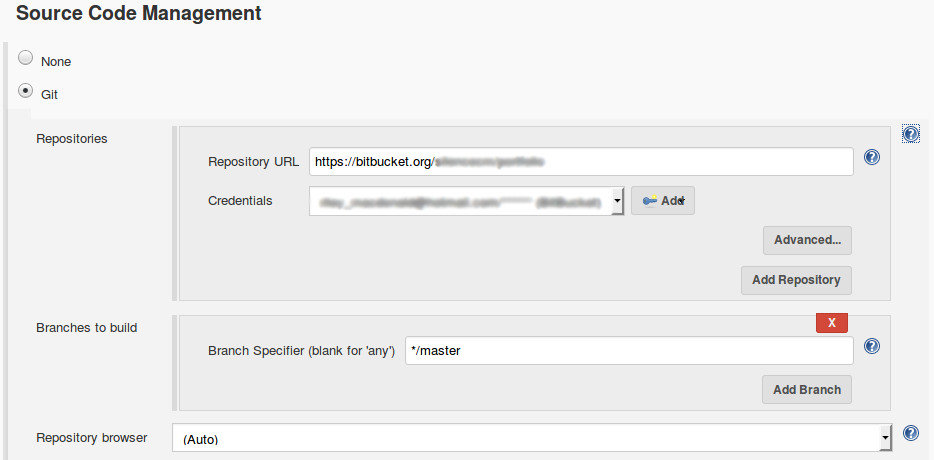
Provide an authentication token in order for Bitbucket to be able to trigger builds. Check the “trigger builds remotely” button and create an authentication token. Anyone with the token will be able to trigger builds remotely so choose a random token.

Scroll down to “Build”. Click “Add Build Step” and choose Execute Shell. Add the following:
1 | ./deploy.sh |
We’ll create the deploy.sh script and add it to our VCS later.
VCS Server
Now we need to configure a webhook in Bitbucket to trigger builds when a push is made. Navigate to the “Settings” section of your repository within Bitbucket. Under workflow choose “Webhooks” -> “Add Webhook”. Build a URL using the following:
- Jenkins Username (you should know this)
- Jenkins User API Token (Users -> Configure User -> Show API Token)
- Jenkins Server Address (including port)
- Jenkins Job Name (defined in job configuration, see above)
- Jenkins Authentication Token (defined in job configuration, see above).
This was tricky to figure out. Here’s how I built my URL:
http://jenkins_username:jenkins_user_api_token@jenkins_server_address:port/job/jobname/build?token=jenkins_auth_token
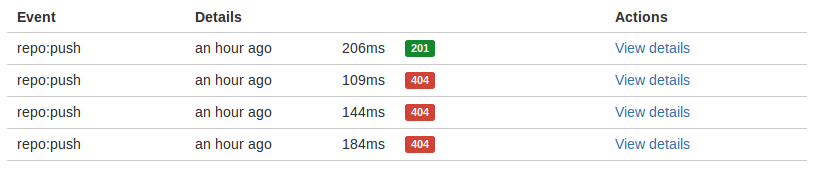
Fortunately Bitbucket has a “View Requests” button for debugging failed attempts to trigger the job (you can see I had a errors before I got it right below):
Next add a new file called deploy.sh to your project VCS. It’s the script added to the Jenkins configuration above that contains the instructions for deploying the code to production. My configuration uses sshpass to send the artifacts to production. Your configuration may alter depending on your needs:
1 2 3 4 5 6 7 8 9 10 11 12 13 14 15 16 17 18 19 20 21 | #!/usr/bin/env bash # Checkout the files pushed from git echo "Checking out master repository." git checkout master # Print out the contents echo "Found the following files on master." ls -la # Tar up the files for scp to the server. echo "Packing up the theme for transfer." tar -zcvf portfolio.tar.gz portfolio # move the tarball to bluehost echo "Sending the theme via SCP to the production server." sshpass -p $PROD_PASSWORD scp portfolio.tar.gz [ssh_username]@[site_url]:public_html/wp-content/themes/portfolio.tar.gz # Unpack the tar to update the theme synchronized with master echo "Unzipping the theme on the production server." sshpass -p $PROD_PASSWORD ssh [ssh_username]@[site_url] 'cd public_html/wp-content/themes/ && rm -rf portfolio && tar -xvzf portfolio.tar.gz && rm portfolio.tar.gz' |
This site uses a custom theme called portfolio I wrote from scratch for WordPress (WP). This script tars the theme and sends it over to the server. The old theme is removed and replaced with the new code.
VCS Notifier
Bitbucket can also be configured to update each interesting commit per the state of a CI build based on the Jenkins result (pending, success and failure). This can be helpful if you don’t feel like looking at Jenkins for build statuses. Follow the plugin instructions / documentation to enable this functionality.